How to Migrate Widget Areas to Block Theme Template Parts Without Breaking Functionality
Widget areas were the backbone of WordPress layout flexibility for over a decade. You registered a sidebar, dropped in a search box, a recent posts list, and a tag cloud, and the theme handled the rest. Block themes change that contract completely. There are no sidebars in the traditional sense, no register_sidebar() calls, and no widget admin screen. Instead, template parts do the work that widget areas used to do, and blocks replace individual widgets.
This is the third article in the Block Theme Migration Series. The previous two covered converting classic templates to block templates and moving custom page layouts into block patterns. Here, the focus is the widget layer: how to map every widget area to the right template part region, convert individual widgets to block equivalents, handle the cases where no direct block equivalent exists, preserve your existing CSS, and set up a fallback so the same codebase works on both classic and block themes during the transition period.
Every section includes working code. All PHP is written to WordPress coding standards. The block markup follows the JSON attribute format the block editor produces. You can copy each snippet directly into your theme.
Why Widget Areas Disappear in Block Themes
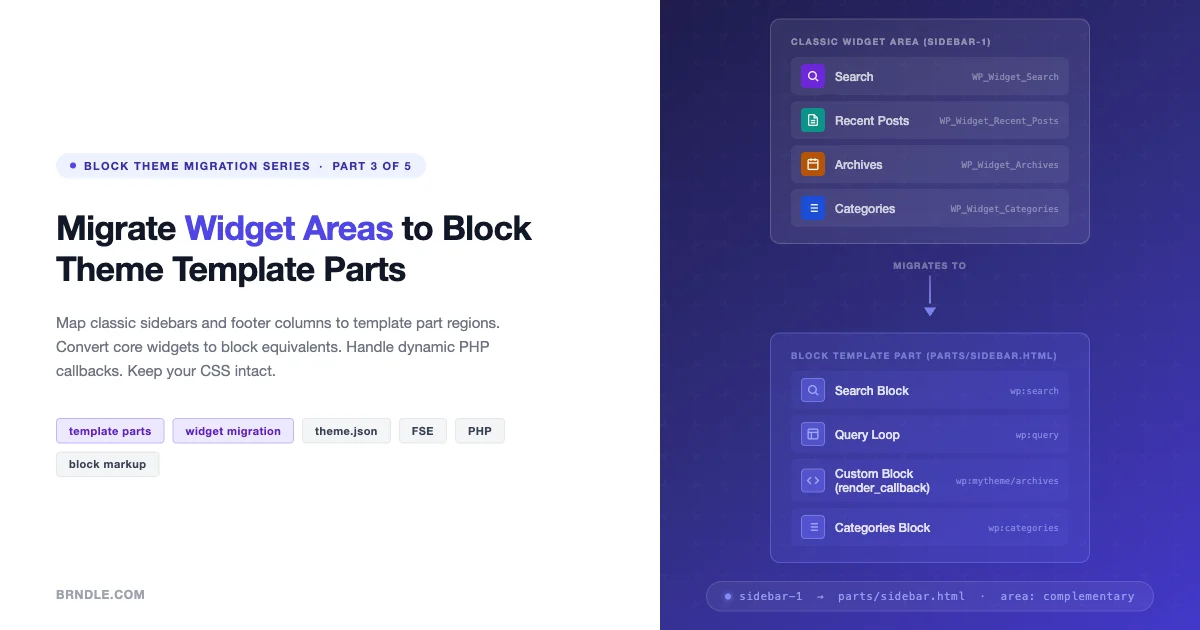
When WordPress loads a block theme, it skips the classic template hierarchy entirely. Instead of loading a PHP template file that calls dynamic_sidebar(), it parses a block template stored in the templates/ directory. Those templates contain block markup including wp:template-part references that pull in reusable regions from the parts/ directory.
The widget system still exists in WordPress core, and register_sidebar() still works. But on a block theme, the Widgets admin screen is replaced by the full Site Editor. There is no widget area to drop widgets into because the layout is controlled entirely through block markup in template files.
This does not mean your widget logic is thrown away. It means the rendering location shifts from a PHP callback in a template file to a position inside a template part HTML file. The data and the functionality remain. The delivery mechanism changes.
Mapping Classic Widget Areas to Template Part Regions
The first step is to draw a clear map between your existing widget areas and the template part regions that will replace them. WordPress uses ARIA landmark roles to label template part areas. The four predefined areas are header, footer, sidebar (which maps to the ARIA complementary role), and uncategorized for anything else.
| Classic Widget Area | Widget Area ID | Block Theme Template Part | ARIA Area |
|---|---|---|---|
| Primary Sidebar | sidebar-1 | parts/sidebar.html | uncategorized (complementary) |
| Secondary Sidebar | sidebar-2 | parts/sidebar-secondary.html | uncategorized |
| Footer Widgets Column 1 | footer-1 | Inside parts/footer.html (column block) | footer |
| Footer Widgets Column 2 | footer-2 | Inside parts/footer.html (column block) | footer |
| Header Widget | header-sidebar | Inside parts/header.html | header |
| Before Content | before-content | parts/before-content.html | uncategorized |
The key insight here is that footer widget columns are not separate template parts. They live inside a single parts/footer.html file, wrapped in a wp:columns block. Each column corresponds to one of the old footer widget areas. This produces the same visual output with far less PHP overhead.
For the sidebar, the template part area value you declare in theme.json affects how the Site Editor labels and groups the part. Use "area": "uncategorized" for sidebars, WordPress does not have a dedicated sidebar area constant, but the ARIA complementary landmark is applied via the tagName attribute on the outer group block.
Declaring Template Parts in theme.json
WordPress reads template part metadata from the templateParts array in theme.json. This is where you name each part, give it a human-readable title, assign its area, and provide a description that appears in the Site Editor. The file at /tmp/brndle-widget-gist/02-template-part-registration.json (see the full gist below) shows the full declaration for sidebar and footer parts.
Once these declarations are in place, WordPress registers the template parts and makes them available in the Site Editor under the appropriate area tabs. Users can then customize each part visually without touching a file.
Converting Common Widgets to Block Equivalents
Most classic widgets have a block equivalent built into WordPress core. The conversion is a matter of knowing which block maps to which widget and how to configure the block attributes to match your widget settings.
Search Widget to Search Block
The classic Search widget (WP_Widget_Search) renders a form with a text input and a submit button. The Search block (wp:search) provides the same output with full block editor control over label text, placeholder, button position, and whether the button shows text or an icon.
The Search block attribute "buttonPosition" accepts three values: "no-button", "button-outside", and "button-inside". Set "buttonUseIcon": true to replace the button label with a magnifying glass icon, which matches the compact style many themes use for widget search.
Recent Posts Widget to Query Loop Block
The Recent Posts widget (WP_Widget_Recent_Posts) queries the five most recent posts and outputs a title list. The Query Loop block (wp:query) is the block equivalent, but it is significantly more flexible. You configure the query via the query attribute object, which accepts perPage, order, orderBy, postType, and a dozen other parameters.
Inside the Query Loop, a wp:post-template block defines what each post entry renders. For a simple title list, include only wp:post-title with "isLink": true. To add dates, include wp:post-date. To add thumbnails, include wp:post-featured-image with a small size attribute.
Archives Widget, No Direct Block Equivalent
This is one of the harder cases. WordPress does have a core wp:archives block, but it was added in WordPress 5.9 specifically for block themes. However, it is not available in the standard block inserter on all WordPress versions. If you are supporting WordPress 5.8 or earlier, or if wp:archives does not appear in your editor, you have two options.
The first option is to use the wp:archives block directly in your template part file. It accepts "displayAsDropdown" and "showPostCounts" boolean attributes. This works on WordPress 5.9 and later.
The second option is to build a custom dynamic block that wraps the wp_get_archives() function call. This approach gives you full control over the output format, adds custom filtering options as block attributes, and works on all WordPress versions. The pattern for building this kind of wrapper block is covered in detail in the dynamic widgets section below.
Widget-to-Block Conversion Reference
| Classic Widget | PHP Class | Block Equivalent | Block Name |
|---|---|---|---|
| Search | WP_Widget_Search | Search | wp:search |
| Recent Posts | WP_Widget_Recent_Posts | Query Loop | wp:query |
| Recent Comments | WP_Widget_Recent_Comments | Latest Comments | wp:latest-comments |
| Archives | WP_Widget_Archives | Archives | wp:archives |
| Categories | WP_Widget_Categories | Categories | wp:categories |
| Tag Cloud | WP_Widget_Tag_Cloud | Tag Cloud | wp:tag-cloud |
| Calendar | WP_Widget_Calendar | Calendar | wp:calendar |
| RSS | WP_Widget_RSS | RSS | wp:rss |
| Text | WP_Widget_Text | Paragraph / HTML | wp:paragraph or wp:html |
| Image | WP_Widget_Media_Image | Image | wp:image |
| Navigation Menu | WP_Nav_Menus_Widget | Navigation | wp:navigation |
| Custom HTML | WP_Widget_Custom_HTML | Custom HTML | wp:html |
For third-party widgets with no block equivalent, the next section covers the correct PHP wrapping approach. The full sidebar template part combining all these blocks is shown in the gist below.
Handling Dynamic Widgets with PHP Callbacks
Not every widget can be replaced with a static block. Widgets that generate dynamic output based on server-side data, recent posts filtered by taxonomy, custom author bios pulled from user meta, WooCommerce cart widgets, require a different approach. The correct migration path is to wrap that PHP logic in a custom dynamic block.
A dynamic block works the same way as a widget’s widget() method, but it is delivered through the block system. You register the block with register_block_type(), provide a render_callback function, and define any configuration options as block attributes. WordPress calls the render callback when it parses the block comment in a template part.
The critical function for dynamic blocks inside template parts is get_block_wrapper_attributes(). This function generates the correct set of HTML attributes for the outermost element of your block output, including any custom classes passed by the user and the automatic wp-block-{namespace}-{name} class. Using this function ensures your block respects the block supports API and inherits color and spacing settings from theme.json.
Using render_block_core_* Functions
WordPress core exposes render functions for its own blocks under the naming pattern render_block_core_{block_name}. For example, render_block_core_latest_posts() is the function that renders the Latest Posts block. You can call these functions directly from your PHP code if you need to embed core block output inside custom logic, though this is an internal API that may change between WordPress versions.
A more stable approach is to call do_blocks() with a block markup string, which routes the render through the official block registry. This is the same function WordPress uses internally to parse and render block templates. Passing block comment markup to do_blocks() gives you the full rendered HTML without depending on internal function names:
For rendering a Query Loop block dynamically, pass the block markup string to do_blocks() with the query attributes set as JSON in the block comment. The block registry reads those attributes and executes the correct render path, including any server-side filtering hooks that plugins may have attached.
Preserving Widget Styling During Migration
Classic themes apply CSS based on the widget ID and the widget CSS class. The widget ID follows the pattern {widget-type}-{instance-number}, so the first Search widget gets the ID search-2 (WordPress starts at 2 for historical reasons). The widget CSS class matches the PHP class name of the widget: widget_search, widget_recent_entries, and so on.
If your theme or child theme has CSS that targets these selectors, you need to replicate them on the block wrapper elements in your template parts. The block editor provides two attributes that handle this: className for extra CSS classes and anchor for the HTML id attribute.
In your template part HTML file, add these attributes to the outer group block that wraps each widget replacement:
Widget CSS Class Mapping
The comment block at the top of the PHP file in the gist contains the full mapping table. Here is a quick reference for the most common cases:
- Search widget: Add
className: "widget widget_search"andanchor: "search-2"to the outer group block - Recent Posts widget: Add
className: "widget widget_recent_entries"andanchor: "recent-posts-2" - Categories widget: Add
className: "widget widget_categories"andanchor: "categories-2" - Tag Cloud widget: Add
className: "widget widget_tag_cloud"andanchor: "tag_cloud-2" - Archives widget: Add
className: "widget widget_archive"andanchor: "archives-2"
If your theme uses before_widget HTML from register_sidebar() with a section tag, make sure the tagName attribute on the group block matches. Set "tagName": "section" to produce a <section> element instead of the default <div>. This preserves the DOM structure that your CSS selectors target.
Fallback Strategies: Detecting Classic vs. Block Theme
If you maintain a plugin or a parent theme that needs to run on both classic and block themes, you cannot assume the widget system is available or that template parts exist. The correct approach is to detect the theme type at runtime and branch accordingly.
WordPress 5.9 introduced wp_is_block_theme() for exactly this purpose. It returns true when the active theme has a templates/index.html file, which is the canonical indicator that a theme is using the block template system. For sites that may be running WordPress 5.8 or earlier, the fallback check inspects the theme directory directly.
The mytheme_render_widget_or_block() function in the gist shows the branching pattern. On a block theme, it calls do_blocks() with a wp:template-part block comment to render the named template part. On a classic theme, it calls dynamic_sidebar() with the widget area ID. Both paths produce a correctly rendered sidebar appropriate for the active theme type.
When to Use the Fallback vs. Committing to Blocks
The fallback pattern is the right choice when you are building a plugin that ships to a broad WordPress audience covering both classic and block themes. It is the wrong choice when you are migrating your own theme. During a theme migration, the goal is to commit to the block theme architecture fully. Leaving fallback code in place adds maintenance weight and can produce inconsistent output as the code paths diverge over time.
The recommended approach for a theme migration is to run both themes in parallel on a staging environment: the classic theme for comparison and the block theme under development. Test every page that previously displayed a widget area and verify the block equivalent renders the same content. Once the block theme covers all cases, retire the classic theme and remove the fallback code.
Building the Footer Template Part
Footer widget areas are the most common multi-column widget setup in classic themes. The migration turns each column into a wp:column block inside a wp:columns container, all wrapped in the footer template part. This approach gives content editors the ability to rearrange footer columns, change their widths, and update content directly from the Site Editor without writing any PHP.
The footer template part uses inline styles on the group block to set background and text colors. In a production setup, these should come from theme.json color palette values referenced by slug, not inline hex values. Replace "style":{"color":{"background":"#1a1a2e"}} with "backgroundColor":"your-palette-slug" to make the color editable from the Global Styles panel.
Step-by-Step Migration Checklist
Use this checklist for each widget area in your classic theme. Work through one area at a time, starting with the primary sidebar. Verify each step on a staging environment before moving to the next area.
Phase 1: Audit and Map
- List all registered widget areas: open wp-admin > Appearance > Widgets (classic theme) and note every registered area and the widgets it contains
- Record each widget’s type, ID, instance number, and any custom title or settings
- Note any custom CSS targeting widget IDs (e.g.,
#search-2) or widget classes (e.g.,.widget_search) - Identify widgets with PHP callbacks that cannot be replaced by a core block
- Map each widget area to a target template part using the mapping table above
Phase 2: Build Template Parts
- Add
templatePartsdeclarations totheme.jsonfor each new part - Create the HTML file in
parts/for each template part - Add core block equivalents for each widget using the reference table
- Add
classNameandanchorattributes to preserve legacy CSS selectors - For custom dynamic widgets, register a custom block with a
render_callback - For multi-column footer areas, build the
wp:columnsstructure insideparts/footer.html
Phase 3: Insert Template Parts into Templates
- Add
wp:template-partblocks to the appropriate template files (templates/single.html,templates/archive.html, etc.) - For sidebars, wrap the template part in a
wp:columnslayout block alongside the main content area - Set the correct
tagName(e.g.,"tagName": "aside"for the sidebar,"tagName": "footer"for the footer)
Phase 4: Test Without Breaking Live
- Use a staging environment with a copy of the live database, never test widget migration on production
- Activate the block theme on staging and compare every template that previously showed widget areas
- Test all CSS that previously targeted widget IDs and classes, open browser DevTools and inspect the rendered HTML to confirm class names are correct
- Test dynamic blocks with custom render callbacks by checking the output against what the classic widget produced
- Test search functionality: submit a search from the Search block and verify results page renders correctly
- Test the Query Loop block output against the classic Recent Posts widget output on a post with no featured image, a short title, and a long title
- Test navigation menus inside the Navigation block, confirm that menu items are assigned correctly
- Open the Site Editor (Appearance > Editor) and verify all template parts appear under the Parts panel with correct area labels
Testing Widget Migration Without Breaking the Live Site
The most common mistake in a widget migration is testing on production. Switching themes on a live WordPress site immediately breaks widget rendering for all visitors. The correct workflow keeps the classic theme active on production throughout the entire migration and development cycle.
Setting Up a Parallel Block Theme
Install the block theme on the staging environment alongside the classic theme. Do not activate it yet. Use the Theme Switcher or the wp_theme_switch action to activate the block theme only on the staging URL. This lets you compare both themes side by side on the same database content.
If you are using a local development tool like Local, create a blueprint of your production site, activate the block theme on the local copy, and develop the template parts there. Commit the template part files to version control and deploy to staging only when the parts are structurally complete. Deploy to production only after a full QA pass on staging.
Verifying Block Theme Widget Output with WP-CLI
WP-CLI is useful for verifying that widget data from the classic theme carried over correctly. Before switching themes, export a snapshot of the widget configuration:
Run wp option get sidebars_widgets to see which widgets are assigned to which widget areas. Run wp option get widget_search and similar commands for each widget type to see their instance data. This snapshot gives you a reference to check against the block configurations you build in the template parts.
After switching to the block theme, run wp post list --post_type=wp_template_part --fields=post_title,post_name,post_status to verify that your custom template parts are registered and have the correct slugs. If a template part does not appear in this list, WordPress cannot find it and the Site Editor will show a broken reference.
Database Customizations Override File Customizations
One detail that catches developers during migration: WordPress stores template part customizations in the database, not in the file system. When a user edits a template part in the Site Editor, WordPress saves the modified block markup to the wp_posts table with post_type = 'wp_template_part'. The file in parts/ becomes the fallback.
This means if you push an updated parts/sidebar.html to production, users who previously customized the sidebar in the Site Editor will not see your update. They will continue to see the database version. To push a file update over the database version, you need to delete the database entry. Use wp post delete $(wp post list --post_type=wp_template_part --name=sidebar --field=ID) --force to remove the database customization and fall back to the file. Be aware that this discards any user customizations.
To understand the full architecture of template parts in block themes before starting your migration, read the guide on building template parts for modular site architecture. It covers areas, nesting, and the difference between template parts and block patterns.
Registering Widget Areas in Classic Theme Mode
For completeness, here is the full classic widget area registration code that this migration replaces. Keep this file in your classic theme for reference when building the block equivalents. The registration function is what gives you the mapping data you need.
Notice how each sidebar registration includes before_widget and after_widget HTML. The wrapper element and classes in before_widget are what your CSS targets. When building the block theme template parts, the group block wrapper with matching className and tagName attributes replaces this HTML.
Common Migration Problems and Solutions
Template Part Does Not Appear in the Site Editor
If a template part file exists in parts/ but does not appear in the Site Editor, check that the templateParts entry in theme.json uses the exact same slug as the filename. The slug footer-col-1 matches the file parts/footer-col-1.html. A mismatch causes WordPress to ignore the file.
Custom Block Not Rendering in Template Part
Custom blocks registered via register_block_type() must be registered before WordPress parses the template. Make sure your init hook fires at priority 10 or later. Template parts are parsed after init completes, so a block registered at priority 10 on init is always available by the time WordPress renders the part.
Sidebar Layout Breaks on Mobile
The wp:columns block stacks columns vertically on mobile by default. If your main content and sidebar are inside a columns block, they will stack on small screens. Control this with the isStackedOnMobile attribute. Set "isStackedOnMobile": true (the default) to stack, or false to force a horizontal layout even on mobile. Use the style attribute with responsive values, or add custom CSS targeting the block class at your breakpoints.
Widget CSS No Longer Applies After Migration
After switching to the block theme, existing widget CSS in your stylesheet may stop applying if the selectors do not match the new markup. Open browser DevTools, inspect the rendered sidebar HTML, and compare the class names and IDs against your CSS selectors. Add the className and anchor attributes to the group block wrappers in your template parts, then clear any caches and test again.
What Comes Next in the Series
This article covered the widget layer: area mapping, block equivalents, dynamic PHP wrappers, CSS preservation, the fallback pattern, and a testing checklist. The next article in the series covers block theme migration of custom post type templates, moving the PHP template hierarchy for CPTs into the block template system, handling post meta display with the Block Bindings API, and building query templates that work with any registered post type.
If you are starting the migration from scratch, the step-by-step guide on converting a classic WordPress theme to a block theme walks through every stage before you reach the widget layer: auditing your PHP template structure, migrating functions.php settings to theme.json, and restructuring your template hierarchy. Complete that process first, then return here for the widget migration step.
For global styles that apply across all the template parts you just built, the theme.json deep dive on global settings and styles covers every settings property, color token naming, per-block style overrides, and CSS custom property output. Understanding the token system in theme.json makes the block attributes in these template parts significantly easier to manage at scale.